


World of Tanks: Stage II Training, Topography
An Evaluation, and Reflection

[Image: a component of the lead graphic from the article which announced the Topography training mode, mildly scribbled upon. Its over a year old now.]
Publication date: 2022-08-30
World of Tanks (WoT) is an on-line team based multiplayer game in which a fixed number of players on each team battle to achieve victory. In a normal battle, the battle times out after 15 minutes, and each team has 15 players. Over time, each player will building up a Garage with various tanks, and Barracks with crews for the tanks. From these a tank and crew are chose to take into a battle. There are multiple battle types, and the game supports Clans. The game producer is War Gaming. See the World of Tanks website for more details. WoT is a global game divided into various regions. The above link is for the EU.
This article is about stage two of WoT's in game training materials, Topography, and why it serves multiple purposes for a starting player.
This article is for these starting players, or the wider WoT community. If you have not played WoT, the article will make very little sense, as it uses terminology specific to the game.
Starting Out
When one begins playing WoT one goes through "Basic Training". One can pull out and just start playing, but that is not a terribly good idea. For a new player basic training is essential, and you receive various rewards for it, not least a Tier VI Tank. Choose this wisely. Consult friends if you have any who have played WoT for a while.
Following basic training, one should "hang out" at the lower tiers of I, II and III and decide if one likes the game. Note that there are a few "old tanks" which are way overpowered at these tiers and some players who only play these at low tiers so that they are more likely to win (known as “stat padding"). This is very annoying, but that's how it is. Don't be dissuaded. This sufferance largely disappears at tiers IV and higher. You'll be there soon enough.
If you decide you like the game, I recommend that you take the next collection of training materials offered in game: Topography. Beside the big red Battle button at the top of the game interface, to the right is where one chooses one's game type. In there are the training materials too. Click on Topography to start.

[Image: an example of a route on a map for Topography. Again, taken from the World of Tanks announcement of the training mode.]
Overview
The primary purpose of Topography is to teach you about the "standard routes" around the maps. The materials are grouped into map collections, starting with the 6 maps which are used at all tiers but to which one is limited in low tier games.
For each map there are 4 "tasks", 2 in which one plays a heavy tank, and 2 for mediums. Participating in any task is solo and has no effect on your account except for the material bonuses when you complete a task or all four tasks for a map.
Each task is worth 20 000 Silver. Completing all 4 for a map is worth an additional 20 000 + 3 x Full Repair Kit, Full Med Kit and Automatic Fire Extinguisher and, the kicker, 1 000 Free Experience. Thus, if you sell the "consumables" you get 145 000 Silver + 1 000 Free XP for each completed map. For a "starting" player, the Free XP is very valuable, as can be the Silver.
These are the "bonuses". The real value is in the tactics and habits that you are forced to learn to complete the "tasks".
Each task follows a standard route around one of the game maps. For each map there are 4 different routes, one heavy and one medium from each of the two spawn points. Do not believe that the Heavies always go where Topography shows. People are people and do what they wish. In live gameplay, flanks are often mixed, and sometimes the "recommendation" is inverted; the current preferred method is exactly the opposite of that suggested, which is often the case on Sand River. So, don't think about which type of vehicle is going on which route, just learn the routes. Or, as War Gaming puts it:
Please note: The traffic patterns you’ll be shown in the Topography mode are just recommendations. A real battlefield will require you to adapt your route to the situation and play according to your team's strategy.
The Heavy tank tasks/routes are by far the easiest. Which is to say that as a starting player you only need to learn a few basic tactics to get 6 * 2 * 20 000, or just under a quarter of a million Silver (240 000). You can also push on to the "Advanced" maps, which are just a little longer and not much harder at all. These easy to obtain bonuses can be very valuable for a "Free to Play" player.
Heavy Tactics
The tactics for the heavy tanks (which also apply to mediums) include:
side scraping
shot baiting
using the zoom and sniper modes
fully aiming your shots

[Image: a visualization for sidescraping, taken from an article on the practice.]
Side scraping is exposing the side of your tank, only, at a very shallow angle (no more than 10 degrees). Your lower plate and the front of your outer track should not be visible to the "enemy". Shots fired at the side will almost always bounce. If they don’t, your angle is too great. You can then come further out, by backing up, whilst the "enemy" is reloading and take your shot in safety before returning to cover. Rinse, repeat.
Similarly, one can expose just the top of one's turret to draw a shot, which in a heavy tank, is likely to bounce too. Either of these two methods are "shot baiting". One can then fire while they reload.
To learn to effectively side-scrape, it is useful to zoom back from the tank so that one can see the angle one is exposing. Zooming in (sniper mode) is essential for long range shots. The Topography tasks encourages one to learn to use the Shift button (or however you have it bound) rather than the mouse wheel. This becomes essential for the medium routes/tasks which are discussed further below.
Fully aiming, is just that: getting the aiming reticle to its smallest size before firing. This is where the Shift key comes in. If your target is at medium to long distance, when you bait their shot you want your ammo already loaded AND being fully aimed at the correct distance, so that you don't have to suffer the wait of aiming which reduces your time to return to a safe position. Even in some of the first 6 "basic" Topography medium tasks you will be unlikely to be able to complete them without have mastered all of the above side scraping/shot baiting/zoom and sniper modes/fully aimed. Thus, try to learn this when doing the far easier heavy routes. Mediums have far less health than heavies and you cannot afford to squander it.
Nonetheless, health is a resource that is there to be used. One learns that Tank Destroyers (TDs) hit hard, are small and are usually at medium to long distance. For a heavy task, one can take a few shots from them because of the large health pool. This is far less the case for mediums.
Routes, Tasks and Puzzles
Each Task/Route is a sequence of moving to a "firing line" and in that vicinity dealing with one or more targets. One completes the task by destroying all targets at each firing line, within “can be ignored” time and keeping enough hit points to do so. For the heavy tasks of the first six maps, one does not need to stray far from the "firing line". For medium tasks/puzzles, there can be advantages found in taking positions a little further afield. WarGaming hints at this by calling the mediums "mobile tanks".
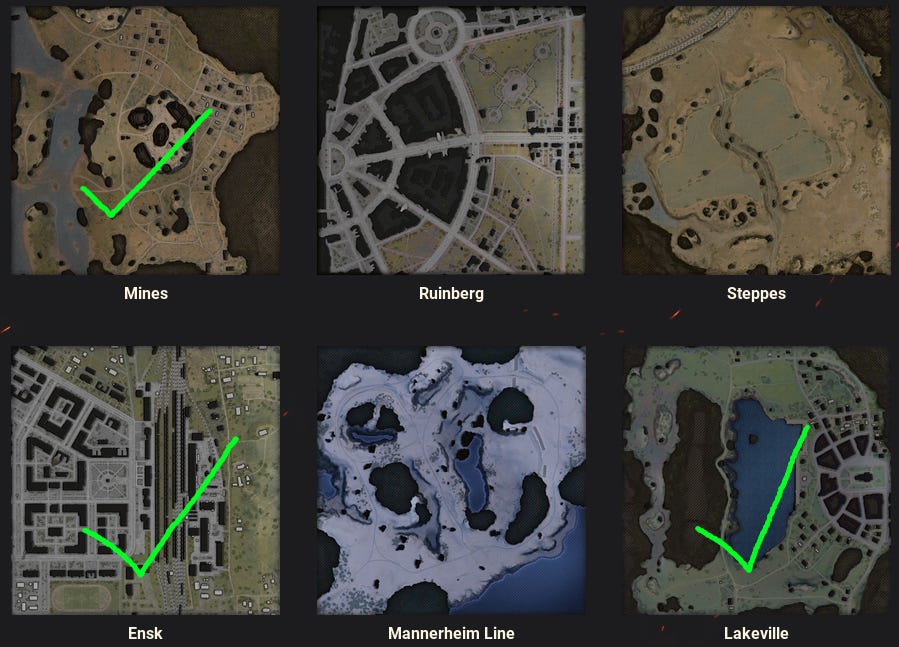
[Image: the six “basic” maps, taken from the same World of Tanks article announcing Topography. The overlayed ticks are on maps which the author found the medium tasks also fairly easy. You may find other maps and routes easy!]
For the six "basic" maps, two is maximum number of targets at a firing line. Three are used occasionally in the next, larger "Advanced" map collection. As mentioned, these "Advanced" maps are no more difficult than the "Basic" maps, they're just longer and you occasionally get these "three enemy" firing lines. Thus, if you've had no trouble with the heavy routes in the Basic Maps, you'll probably have little more in the "Advanced". The same is true for Mediums. If you're mastered all of the "basic" maps, the advanced are only slightly more challenging.
The way in which WarGaming have chosen the targets at the various firing lines is often indicative of the types of tanks one will see at them in real game play. A good example is on El Halluf as one approaches the enemy base in a medium from the north east spawn. The three targets are a light on the west side of the hill in the middle, and a TD and a heavy on the escapement above. In real gameplay, more likely are two TDs and the light, or even more likely two lights and two TDs and a medium. But, hopefully “in game” you’ll have the support of the equivalent.
Each Task/Route is narrated using only a small collection of repeated phrases, which become quite annoying. However, one does need the audio clues for enemies firing, so one is better served with sound on. Perhaps one can mute the dude?
One of the narrator's most annoying phrases is to encourage you to get a move on. You will almost never run out of time, so just ignore it. Time is added on as you complete firing lines, especially late on each route. That being said, I did complete one route with a single second to spare. That is once out of 16 completed heavy routes. I never "timed out". Nonetheless, time is a factor in real in-game battles. Though annoying, the “instructor” is encouraging you to be aware of time, which is an element of the game.
Other Lessons, and Medium Tactics
The spotting mechanics of the game are used, which implies that “bush” mechanics are also invoved. At many firing lines one begins "unspotted" and thus one can often also take a first free shot. One is automatically spotted after this shot (here ends “bush mechanics” for that firing line). Similarly, one is normally (perhaps always) auto "unspotted" after completing a firing line. Thus, be careful to stay unspotted as one moves to the next line. The markers which lead one from one firing line to the next need to be driven close to but not necessarily through. Be aware of your "spotted" status as you move between lines and approach the new one, especially for medium tasks. That free shot is valuable.
When you reach a firing line, the targets for it are highlighted on your mini-map. This is a hint by WarGaming at the importance of the mini-map. Indeed, the reason one upgrades radios is to increase their range to maintain your understanding of your team's spotting of the enemy and your and their health bars. Indeed, any good player will tell you that you should spend at least 50% of your time watching the mini-map. Its a team game. To best support your team you need to know where they are, how they are doing and what they are facing. For advice on a good configuration of your interface, including expanding the mini-map, the author recommends the video by QuickyBaby, which is included below under sources.
As an example of the use of the "unspotted" mechanic, there is a position for a medium route on Ruinberg in which an SPG and a TD are the targets. If one begins unspotted, the smart move is to take that first unspotted shot on the TD, which requires two shots to remove. The SPG is a one shot, and is easy to remove before it fires. It also does far less damage than a TD. Thus, by using the “free” shot on the TD, one risks taking only a single shot from it.
This is another of the lessons built into the Topography package; threat awareness and how to best deal with multiple enemies. Of course, keep in mind that the targets are stationary and this "threat awareness" does not directly translate to live game play. It does, nonetheless, get one into the habit of thinking about it.
Also, on the Ruinberg map, there is a position in which the best tactic is "reverse side scraping". This is just like regular side scraping but the rear rather than front of your tank is towards, but hidden from, the target. This tactic works best on tanks with forward mounted turrets, which one has in the T-34.
On both Steppes and Mannerheim Line there are situations with two targets in which one is best served by neutralizing one of the targets by positioning a rock between oneself and it while one engages the other target. The lesson here is that terrain is a resource in itself, not just ridges and buildings.
For Mediums one searches for ways to be able to damage a target whereby they cannot damage you. One can wander wherever one wishes on any map. However, there are additional "enemies" which are not part of the route which will appear and start shooting at you. This is a "game within a game", if you like. Have fun, destroy them all! Ammo is unlimited, you are only limited by time and hit points.
The "not be damaged" positions vary. Unlike in a real game, the targets may not move, except for the turrets of turreted tanks, and TDs rotating on their tracks. So, one can sometimes find the corner of a turret, or a protruding track and safely destroy the target. The same can be true when "getting under the gun line" of a TD on a hill.
Another game element which comes into play is the randomness of shot placement in the aiming reticle. One on particular map, on a medium route one has to target a heavy at medium to long distance. The temptation is to use the angled ridge line at the firing line and shot bait. However, even with pre-aiming at full zoom it proves rather difficult to get off a shot and retreat before taking incoming fire. Instead, one can retreat from the gun line and get behind a bush further back. There, one can fully aim and almost guarantee a full hit for the first "unspotted" shot. As one is a medium, and fully aimed, the next shot will come around when the heavy spots you are returns fire. But, because heavies are less accurate, generally, than mediums and because the distance is so long, and that you are already fully aimed, their shot will likely miss you, and yours is like to hit and thus destroy the heavy.
The "randomness of damage" (+/- 25%) also comes into play. Mediums can take 2 or 3 shots to destroy some targets, or heavies 1 or 2.
There are likely many other solutions to the scenarios described above. However, it is clear that WarGaming put quite some thought into the scenarios at some of the Medium tank route firing lines. For this, they deserve credit.
Re-Starting Out
I played WoT for a few years some years ago, and gave it a break. I returned and decided to start a “Free to Play”, fresh account. I'm a below average player who likes to play light tanks. I'm not a good shot, but love being around in the late middle to end phase of a game to give my team the advantage of vision. Besides the Tier VI from basic training, I only have a few Tier V's and lower tier tanks. I decided to see what was available in the "game type" menu and found Topography, which I'd tried a few months earlier and found annoying.
This time, I stuck with it. I wanted the Free XP. This article is based on having completed the 6 basic maps and 2 of the "Advanced". I didn't learn too much that was "new", but it reinforced the importance of some things I do not do well enough. So, I'm happy with my 8 000 Free XP and some valuable re-inforcement. The 800 000 Silver is fine too (I haven't sold the consumables).
I'll come back to Topography when I want some more Free XP, or I find myself falling into bad habits.
I really enjoyed the medium route puzzles. Mentally, I would note which tactics were required in sequence at each "firing line"; shot baiting, free first shot, side scraping, reverse side scraping, use rock to block second target, get under gun line, shoot corner of heavy, shoot tracks etc.. I enjoyed looking for attacks from which I was invulnerable. The search for these solutions is often born of necessity. I needed to eliminate that TD on the hill before taking on the medium. Shot baiting around a slopped ridge was okay, but the TD was at medium distance and presented a very small target, so I would always take damage. It was early in the route and I could not afford that damage. So, I had employ some creative thinking.

[Image: Red is what you learn in Topography. Green is what you do. Blue is where you get shot from if you take the Red path.]
I saw only one glaring error in the training materials. On El Halluf, starting as a heavy on the south, they take you around the north of the big boulder leading to the steep approach to the north west corner. Do NOT do that in a real game. You'll get shot by TDs from the other side. That route is only useful for the fastest of fast mediums, and even then you'd want a really good cammo rating. Do not feed the enemy TDs! Equivalently, your tanks will be spotted by the enemy lights and thus the enemy will know your composition heading to the flank. Don't feed the enemy with information early!
The Effect
After having spent a few hours a day for a few days earning some credits and solving the medium puzzles to earn the Free XP, I headed back to the game. I'm grinding towards the German Tier V tech-tree medium, which I believe is a good tank. So, I'm playing the Tier IV, the Pz.Kpfw. III Ausf. J, and get a bottom tier match making.
The advantage of the tank is speed. It has crap armour, and an inaccurate gun. I recognize my limitations, and hang back trying to assist flanks. In the end, we're going to lose and I decide to "defend my arty". I spot several approaching vehicles, and almost take out their light (a Luchs). Its a loss. But with 500 odd damage and 700 odd spotting, its not bad for a Tier IV at bottom tier.
Next I get the dream. My Matilda is top tier against Tier III's with a south start on Lakeville with no SPGs. Straight to the valley I head. With me is the excellent German Tier III light and behind us a TD and a couple of lights. The enemy stupidly focuses me. Well, I encouraged that. The Matilda's frontal armor is very strong. Anyone silly enough to come over the ridge is shot by me, or the Pz.Kpfw. III Ausf. E. Meanwhile the rear are just peppering them. No enemy makes it over the ridge. I keep a constant focus on a TD using the location on the rocks above to the west. I get tagged once, but in the end he falls to my Matilda. The valley pass on Lakeville is pretty much designed as a stalemate. The better team will win it in the end, but meanwhile the Town flank tends to move more quickly, and luckily for us, our team won that well. In the end, our mediums and lights were behind what was left of the tanks we had bottled up in the valley. Because our Town flank did well and our flank held, we won 15-3.
This is what the "training" did for me: better situational and tactical awareness. Making the best of a poor situation, or using a dominant position to control a flank. The training forced me to re-focus on core game mechanics; hit points, armor, positioning and vision.
Summary
If you are starting out in WoT and are enjoying the game and its challenge, then see the Topography training as a resource. There is in-game currency, and more importantly perhaps, thousands of Free XP available. The heavy tasks are easy and will reinforce basic tactics. The medium tasks are more complex puzzles which are sometimes best solved with "next level" tactics.
For three of the first six "basic" maps, even the medium tasks are not difficult, as noted on the image above.
So, have at it. 3 000 Free XP and 350 000+ silver is available for maybe 2 to 4 hours of solo fun. If you’re having a bad run of games and getting frustrated, Topography is a place to go and calm down, hone your skills and earn some rewards.
Gratuitous Advice
Save your Free XP for saving you from the nightmare of stock tanks. Almost all tanks have something about them, once upgraded, which is worth exploring. Don't use Free XP to "get the next tank" from a tank, except in rare horrid cases. 3 000 Free XP goes a long way when upgrading tanks at low tier. Do the essentials; get the turret (and tracks if needed), should you wish. Even better, save it for module upgrades at the later tiers.
Sources
Topography: A Mode to Learn Maps in World of Tanks, World of Tanks Europe, uploaded 2021-08-05
World of Tanks || Settings Guide #TankBetter, QuickyBaby, his youtube channel, uploaded 2016-12-08
Note: there are many, many valuable pieces of configuration advice given in this video. One very important one is to enlarge your mini-map.
Copyright and Licensing
This work is copyright to the blog's author with CC BY-SA 4.0 licensing. Have fun, reuse, remix etc. but give credit and place no further restrictions. Lets build culture.